ecmread configuration guide
This is a guide to setting up a power monitoring system using one or more Brultech devices and ecmread. The power monitoring system has three components: data collection, data storage, and data display.
The first part of this document enumerates some of the ways to collect, save, and display data from the ECM.
The second part contains instructions for installing ecmread on linux or windows, with data saved to database or on-line services.
Example Configurations
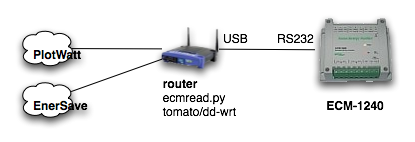
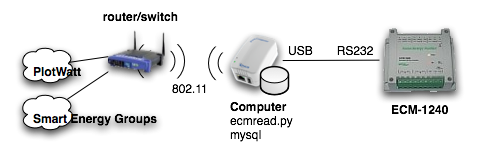
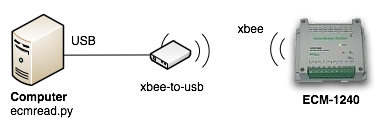
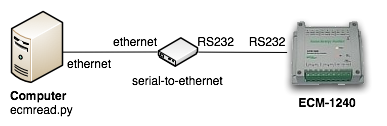
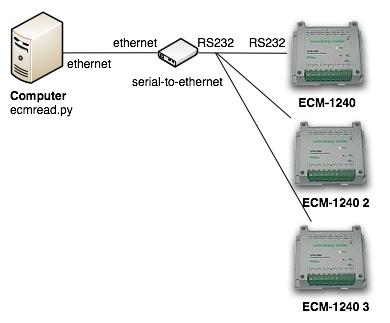
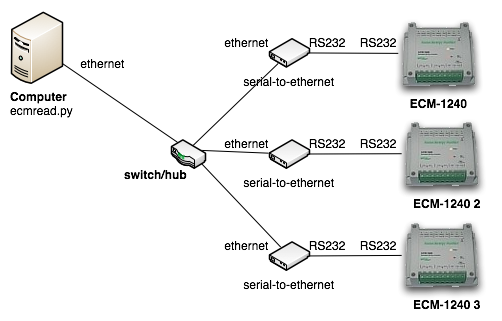
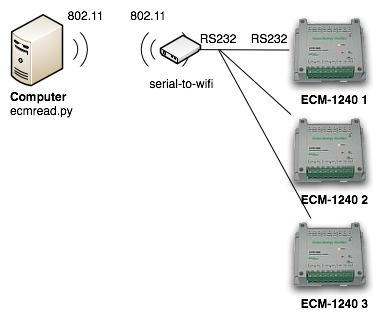
The ECM-1240 cannot store data, nor can it transmit data to a monitoring service. You must either keep a computer on all the time collecting data, or install a serial-to-ethernet or xbee-to-ethernet adapter that can forward ECM data to a service that understands ECM packets. Plug computers such as the Nimbus from Ionics or the DreamPlug from globalscale, or low-power devices such as the raspberry pi or beagleboard work very well as always-on computers. It is even possible to do the data collection and storage on a router by running Tomato or DD-WRT.
This section shows a few typical configurations.
Data Collection
There are a few ways to collect data from the ECM-1240. The ECM-1240 provides serial and optionally xbee interfaces. Serial-to-ethernet and serial-to-wifi adapters provide ethernet or wifi, respectively. Data can be collected by polling the ECM-1240 (serial or tcp/ip), or by responding to ECM data uploads from a serial-to-ethernet or xbee-to-ethernet device. Any type of computer will work, from a regular workstation to a low-power plug computer. It is also possible to use a router as the data collector.
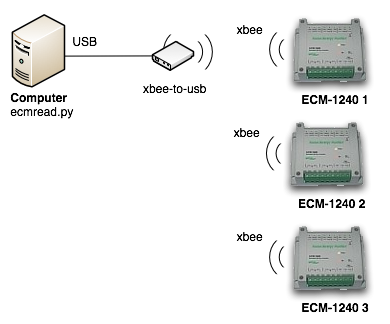
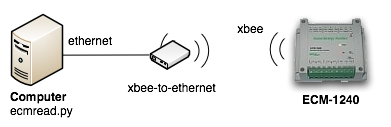
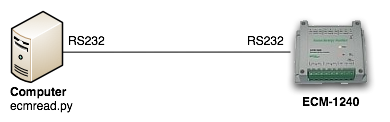
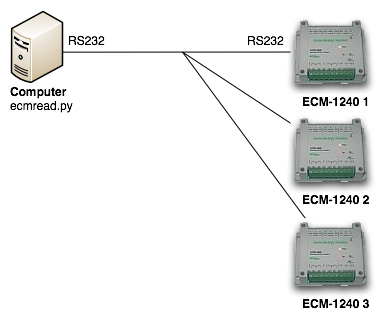
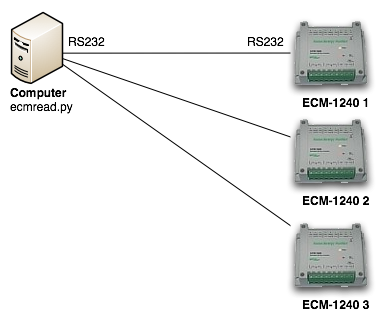
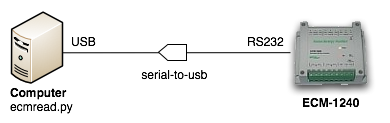
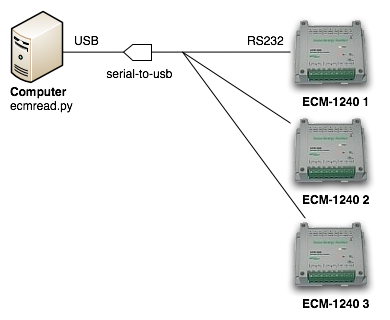
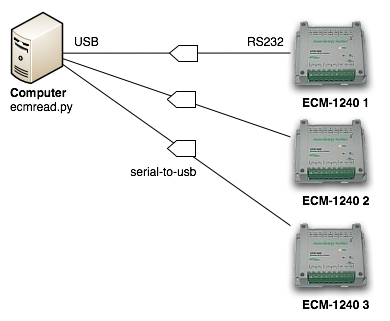
Here is the matrix of computer-to-ECM configuration options. The options can be combined, if necessary. For example, one might use a serial connection to an ECM that is located close to the data collection computer, but Wifi-with-xbee to connect to an ECM in a different room or building.
|
|
Single ECM |
| Multiplexed ECMs |
| Multiple ECM Interfaces |
| XBee / USB |
|
 |
|
 |
|
|
| XBee / Ethernet |
|
 |
|
 |
|
|
| RS232 |
|
 |
|
 |
|
 |
| USB |
|
 |
|
 |
|
 |
| Ethernet |
|
 |
|
 |
|
 |
| WiFi |
|
 |
|
 |
|
 |
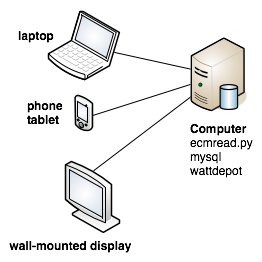
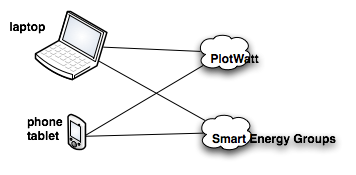
Data Storage
Once the data have been collected from the ECM, they can be saved locally or to a monitoring service.
|
Local Storage
Data are collected using ecmread then saved to a local mySQL database.
|
 |
| |
|
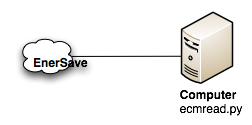
Remote Storage
Data are collected using ecmread then saved to a single monitoring service.
|
 |
| |
|
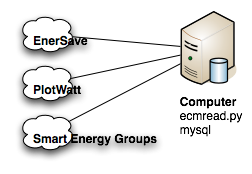
Local and Remote Storage
Data are collected using ecmread then saved to a local mySQL database and multiple monitoring services.
|
 |
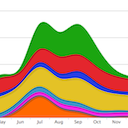
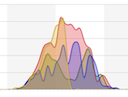
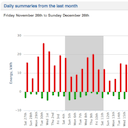
Data Display
Once data have been saved the fun begins. Graphs make trends easier to see and bring historical data to life. Analysis tools enable zooming in and out and overlaying different parts of the data from any number of sensors. Reporting tools provide summaries and facilitate comparisons.
How to configure ecmread on windows
These are instructions for creating a windows-based data logger that will capture ECM output and upload it to one or more monitoring services.
Install pre-requisites:
- python
- http://python.org/download/windows
- pyserial (if reading from a serial port)
- http://sourceforge.net/projects/pyserial/files/pyserial
Install ecmread:
mkdir c:/Program Files/ecmread/bin
copy ecmread-x.y.z.py c:/Program Files/ecmread/bin/ecmread.py
Start by making sure that ecmread can collect data:
python ecmread.py --serial --serialport=COM1 -p
This should start printing data from the ECM.
Create a configuration file c:/Program Files/ecmread/etc/ecmread.cfg:
[general]
serial_read = true
serial_port = COM1

[smartenergygroups]
smartenergygroups_out = true
seg_token = SEG_TOKEN_GOES_HERE
Run ecmread with the configuration file, also printing data as it is acquired:
python ecmread.py -c ecmread.cfg -p
Once everything works properly, remove the -p option.
How to configure ecmread with serial-to-ethernet adapter
Serial-to-ethernet adapters are available to convert ECM serial output to ethernet or ECM xbee output to ethernet. In either case, the ECM data show up as a device on the ethernet network.
When reading data over TCP/IP, ecmread can act as either client or server. Many serial-to-ethernet adapters can be configured as either client or server. If the adapter is in client mode, then ecmread should run in server mode. If the adapter is in server mode, then ecmread should run in client mode.
When should ecmread run as client and when should it run as server? If there are multiple serial-to-ethernet adapters, all of them can communicate with a single instance of ecmread running as server. If the serial-to-ethernet adapter is behind a firewall or network address translation on a network segment separate from ecmread, then running the adapter in client mode and ecmread in server mode is the easiest way to bridge the networks.
adapter as client, ecmread as server
Using the software that came with the adapter, configure the server host and port to the machine on which ecmread will run. Run ecmread in server mode, listening on the indicated port:
ecmread.py --ip --ip-mode=server --ip-port=8083
The equivalent configuration file would be:
[general]
ip_read = true
ip_port = 8083
ip_mode = server
adapter as server, ecmread as client
Using the software that came with the adapter, configure the adapter to listen on a port and note the address of the adapter. Run ecmread in client mode, connecting to the address and port of the adapter:
ecmread.py --ip --ip-mode=client --ip-port=5000 --ip-host=192.168.70.2
The equivalent configuration file would be:
[general]
ip_read = true
ip_port = 5000
ip_host = 192.168.70.2
ip_mode = client
How to configure ecmread with various hosted power monitoring services
This is how to set up a linux-based data logger that will capture ECM output and upload it to one or more monitoring services. The data logger can read via serial, usb using serial-to-usb adapter, TCP/IP using serial-to-ip adapter, TCP/IP using zigbee. These instructions assume a serial connection between the ECM and the logger, and upload to PlotWatt, EnerSave, and SmartEnergyGroups.
Install pre-requisites (required only for serial connection to ECM):
% apt-get install python-usb
% apt-get install python-serial
Install ecmread:
mkdir -p /opt/ecmread/bin
cp ecmread-x.y.z.py /opt/ecmread/bin/ecmread.py
Create a configuration file /opt/ecmread/etc/ecmread.cfg such as this:
[general]
serial_read = true
serial_port = /dev/ttyUSB0

[plotwatt]
plotwatt_out = true
pw_house_id = PW_HOUSE_ID_GOES_HERE
pw_api_key = PW_API_KEY_GOES_HERE
pw_map=399999_ch1,9990,399999_ch2,9991

[enersave]
enersave_out = true
es_token = ENERSAVE_TOKEN_GOES_HERE

[smartenergygroups]
smartenergygroups_out = true
seg_token = SEG_TOKEN_GOES_HERE
Log in to the web site of each service to obtain the token, id, and/or key needed by that site. Enter it in the appropriate place in the configuration file. Some services (e.g. PlotWatt) also require configuration of devices before data collection begins. For example, replace 399999 with the serial number of your ECM and 9990/9991 with your PlotWatt device IDs.
If you do not want to send data from all channels, or if you want to apply labels to each channel, then specify a channel map for each service. Some services (e.g. PlotWatt) require a map and manual configuration of channel info. Some services (e.g. EnerSave) support different device types such as generation or load. Notice that the map format varies slightly between services. Details for each service are in the first part of ecmread.py.
Use the *_out directives to enable/disable a service. More than one service can be enabled at once, and they can be combined with local database storage (see the entry on this page for database configuration).
Test everything by running ecmread:
/opt/ecmread/bin/ecmread.py -p -c /opt/ecmread/etc/ecmread.cfg
The program will run for awhile as it buffers data. After a minute or so it will start sending data to the services.
Log in to each service web site to verify that data are being uploaded. Once everything is working, disable per-packet output by removing the -p option and silence the upload verbosity by adding the --quiet option.
How to configure ecmread with mysql on debian linux
This is how to set up a linux-based data logger that will capture ECM output and store it in a mysql database. The database can be on the same machine that reads the ECMs, or not. The machine that reads the ECMs can read via serial, usb using serial-to-usb adapter, TCP/IP using serial-to-ip adapter, TCP/IP using zigbee. These instructions assume a direct serial connection between the ECM and the logger.
Install pre-requisites:
% apt-get install mysql-server
% apt-get install python-mysqldb
% apt-get install python-usb
% apt-get install python-serial
Install ecmread:
mkdir -p /opt/ecmread/bin
cp ecmread-x.y.z.py /opt/ecmread/bin/ecmread.py
Verify that ecmread collects data properly:
/opt/ecmread/bin/ecmread.py --serial --serialport=/dev/ttyUSB0 -p
Configure mysql:
% mysql -u root -p
mysql> create database ecm;
mysql> grant usage on *.* to ecmuser@ecmclient identified by 'ecmpass';
mysql> grant all privileges on ecm.* to ecmuser@ecmclient;
mysql> create table ecm
    -> (id int primary key auto_increment,
    -> time_created int,
    -> ecm_serial int,
    -> volts int,
    -> ch1_amps int,
    -> ch2_amps int,
    -> ch1_w int,
    -> ch2_w int,
    -> aux1_w int,
    -> aux2_w int,
    -> aux3_w int,
    -> aux4_w int,
    -> aux5_w int);
mysql>exit
Test everything by running ecmread, reading from serial port and writing to the database:
/opt/ecmread/bin/ecmread.py --serial --serialport=/dev/ttyUSB0 -d --db-database=ecm --db-host=ecmhost --db-user=ecmuser --db-passwd=ecmpass
This should result in a record being written to the database every minute for each ECM that the logger can see on the specified interface. If there are multiple serial cables, start ecmread with a different serialport option for each one, but the same database parameters.
Note that in this configuration the database will grow. Ensure there is sufficient disk space, or implement a mechanism to prune the database. If you just want to use the database as a data transfer mechanism, not a data repository, then create the table without the 'id' primary key.
Each ECM has two parameters that control when it transmits packets: packet send frequency (typically 10 seconds or so), and packet trigger threshold (typically 100 W). The ecmread script defines the insert_period parameter (default is 60 seconds) to determine how often to write to the database.
Ensure that data are recorded to the database with:
select * from ecm;
or, to see only the latest record(s):
select * from ecm where time_created = (select max(time_created) from ecm);
Once everything is working, silence the ecmread verbosity with the --quiet option.
A configuration file can be used instead of command-line options. Create a configuration file /opt/ecmread/etc/ecmread.cfg:
[general]
serial_read = true
serial_port = COM1

[database]
db_host=localhost
db_database=ecm
db_user=ecmuser
db_passwd=ecmpass
Run ecmread with the configuration file:
/opt/ecmread/bin/ecmread.py -c /opt/ecmread/etc/ecmread.cfg
How to run ecmread at system startup on linux
To start ecmread at system startup, install an rc script such as this:
#!/bin/sh

PIDFILE=/var/run/ecmread.pid
APP=/opt/ecmread/bin/ecmread.py
CFG=/opt/ecmread/etc/ecmread.cfg

set -e

case "$1" in
    start)
    echo -n "Starting ecmread:"
    $APP -c $CFG 2>&1 >> /var/log/ecmread.log &
    pid=$!
    echo $pid > $PIDFILE
    echo
    ;;

    stop)
    echo -n "Shutting down ecmread:"
    if [ -f $PIDFILE ]; then
        kill `cat $PIDFILE`
        rm $PIDFILE
    fi
    echo
    ;;

    *)
    echo "Usage: $0 {start|stop}" >&2
    exit 1
    ;;
esac

exit 0
On debian systems use a script like this:
ecmread.rc
by doing something like this:
cp ecmread.rc /etc/init.d/ecmread

chmod 755 /etc/init.d/ecmread

update-rc.d ecmread defaults 99
How to configure mysql database for use with ecmread
These are instructions for creating a mysql database that will receive data from ecmread.
Create the database called ecm, grant access to ecmuser@ecmclient with password ecmpass, then create the table called ecm:
% mysql -u root -p
mysql> create database ecm;
mysql> grant usage on *.* to ecmuser@ecmclient identified by 'ecmpass';
mysql> grant all privileges on ecm.* to ecmuser@ecmclient;
mysql> create table ecm
    -> (id int primary key auto_increment,
    -> time_created int,
    -> ecm_serial int,
    -> volts int,
    -> ch1_amps int,
    -> ch2_amps int,
    -> ch1_w int,
    -> ch2_w int,
    -> aux1_w int,
    -> aux2_w int,
    -> aux3_w int,
    -> aux4_w int,
    -> aux5_w int);
mysql>exit
Copyright © Matthew Wall, all rights reserved
Last modified: